Create an EfL Form Template from a Blank Canvas
Form Managers create and manage EfL Form Templates. These can be created using a preset template or from a blank canvas. Once a Form Template has been set up Form Users can use it to create EfL Forms for different learners/uses.
There are four different types of EfL Forms and these different configurations are set up at EfL Form Template level. They are:
- multiple Forms for individual Learners eg incident Form, homework Form
- a single Form for individual Learners without historical versions eg End of Term Report
- a single Form for individual Learners with historical versions ie changes can be tracked over time eg Pen Portrait, Pupil Profile
- a non-learner Form eg Curriculum on a Page
EfL Form Templates are set up on the Web Console.
Here is a video that shows how to create a new Form Template from a Blank Canvas
Here are the steps to create a new Form Template from a Blank Canvas
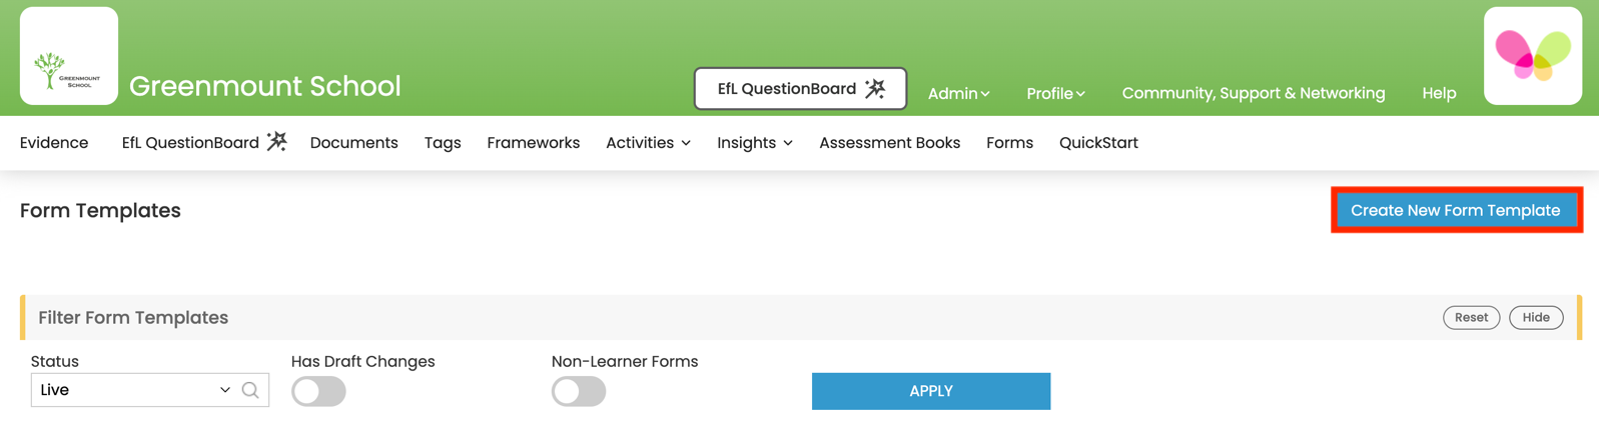
1. On a computer, login to the Web Console, go to ‘Admin’ and select ‘Form Templates’.
See below...

2 Select ‘Create a New Form Template’.
See below...
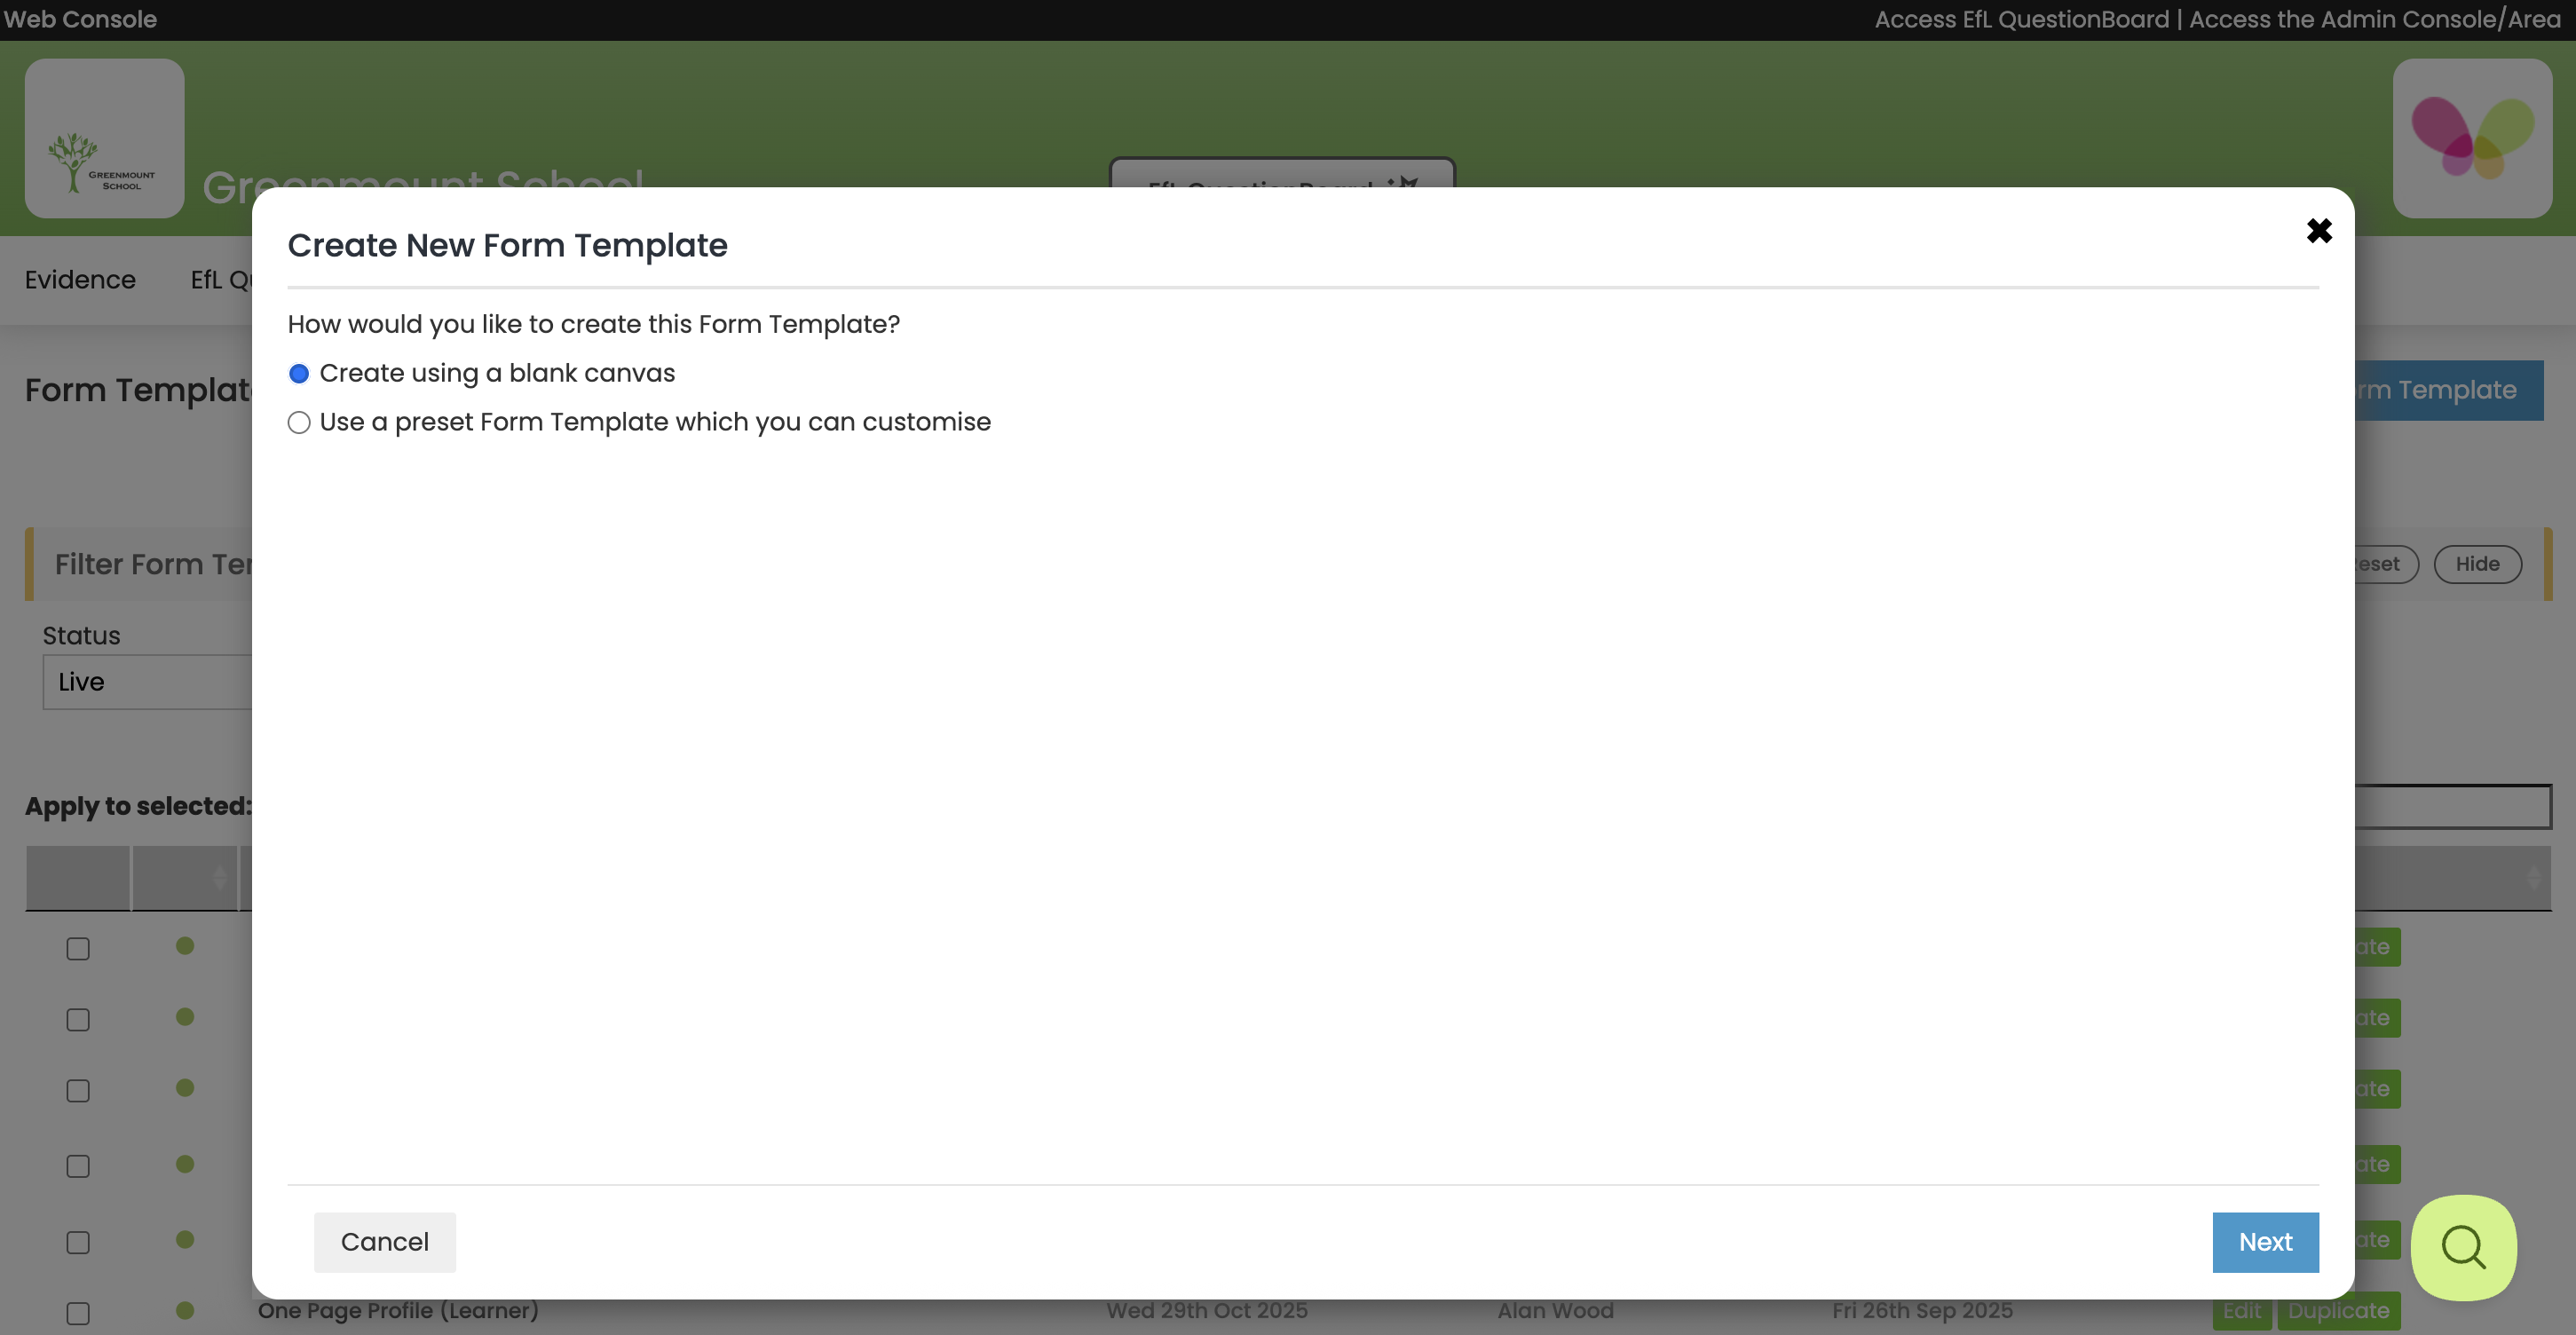
3 In this guide we are Creating a New Form Template from a blank canvas. Select ‘Create using a blank canvas’. Click ‘Next’ (bottom right).
See below...
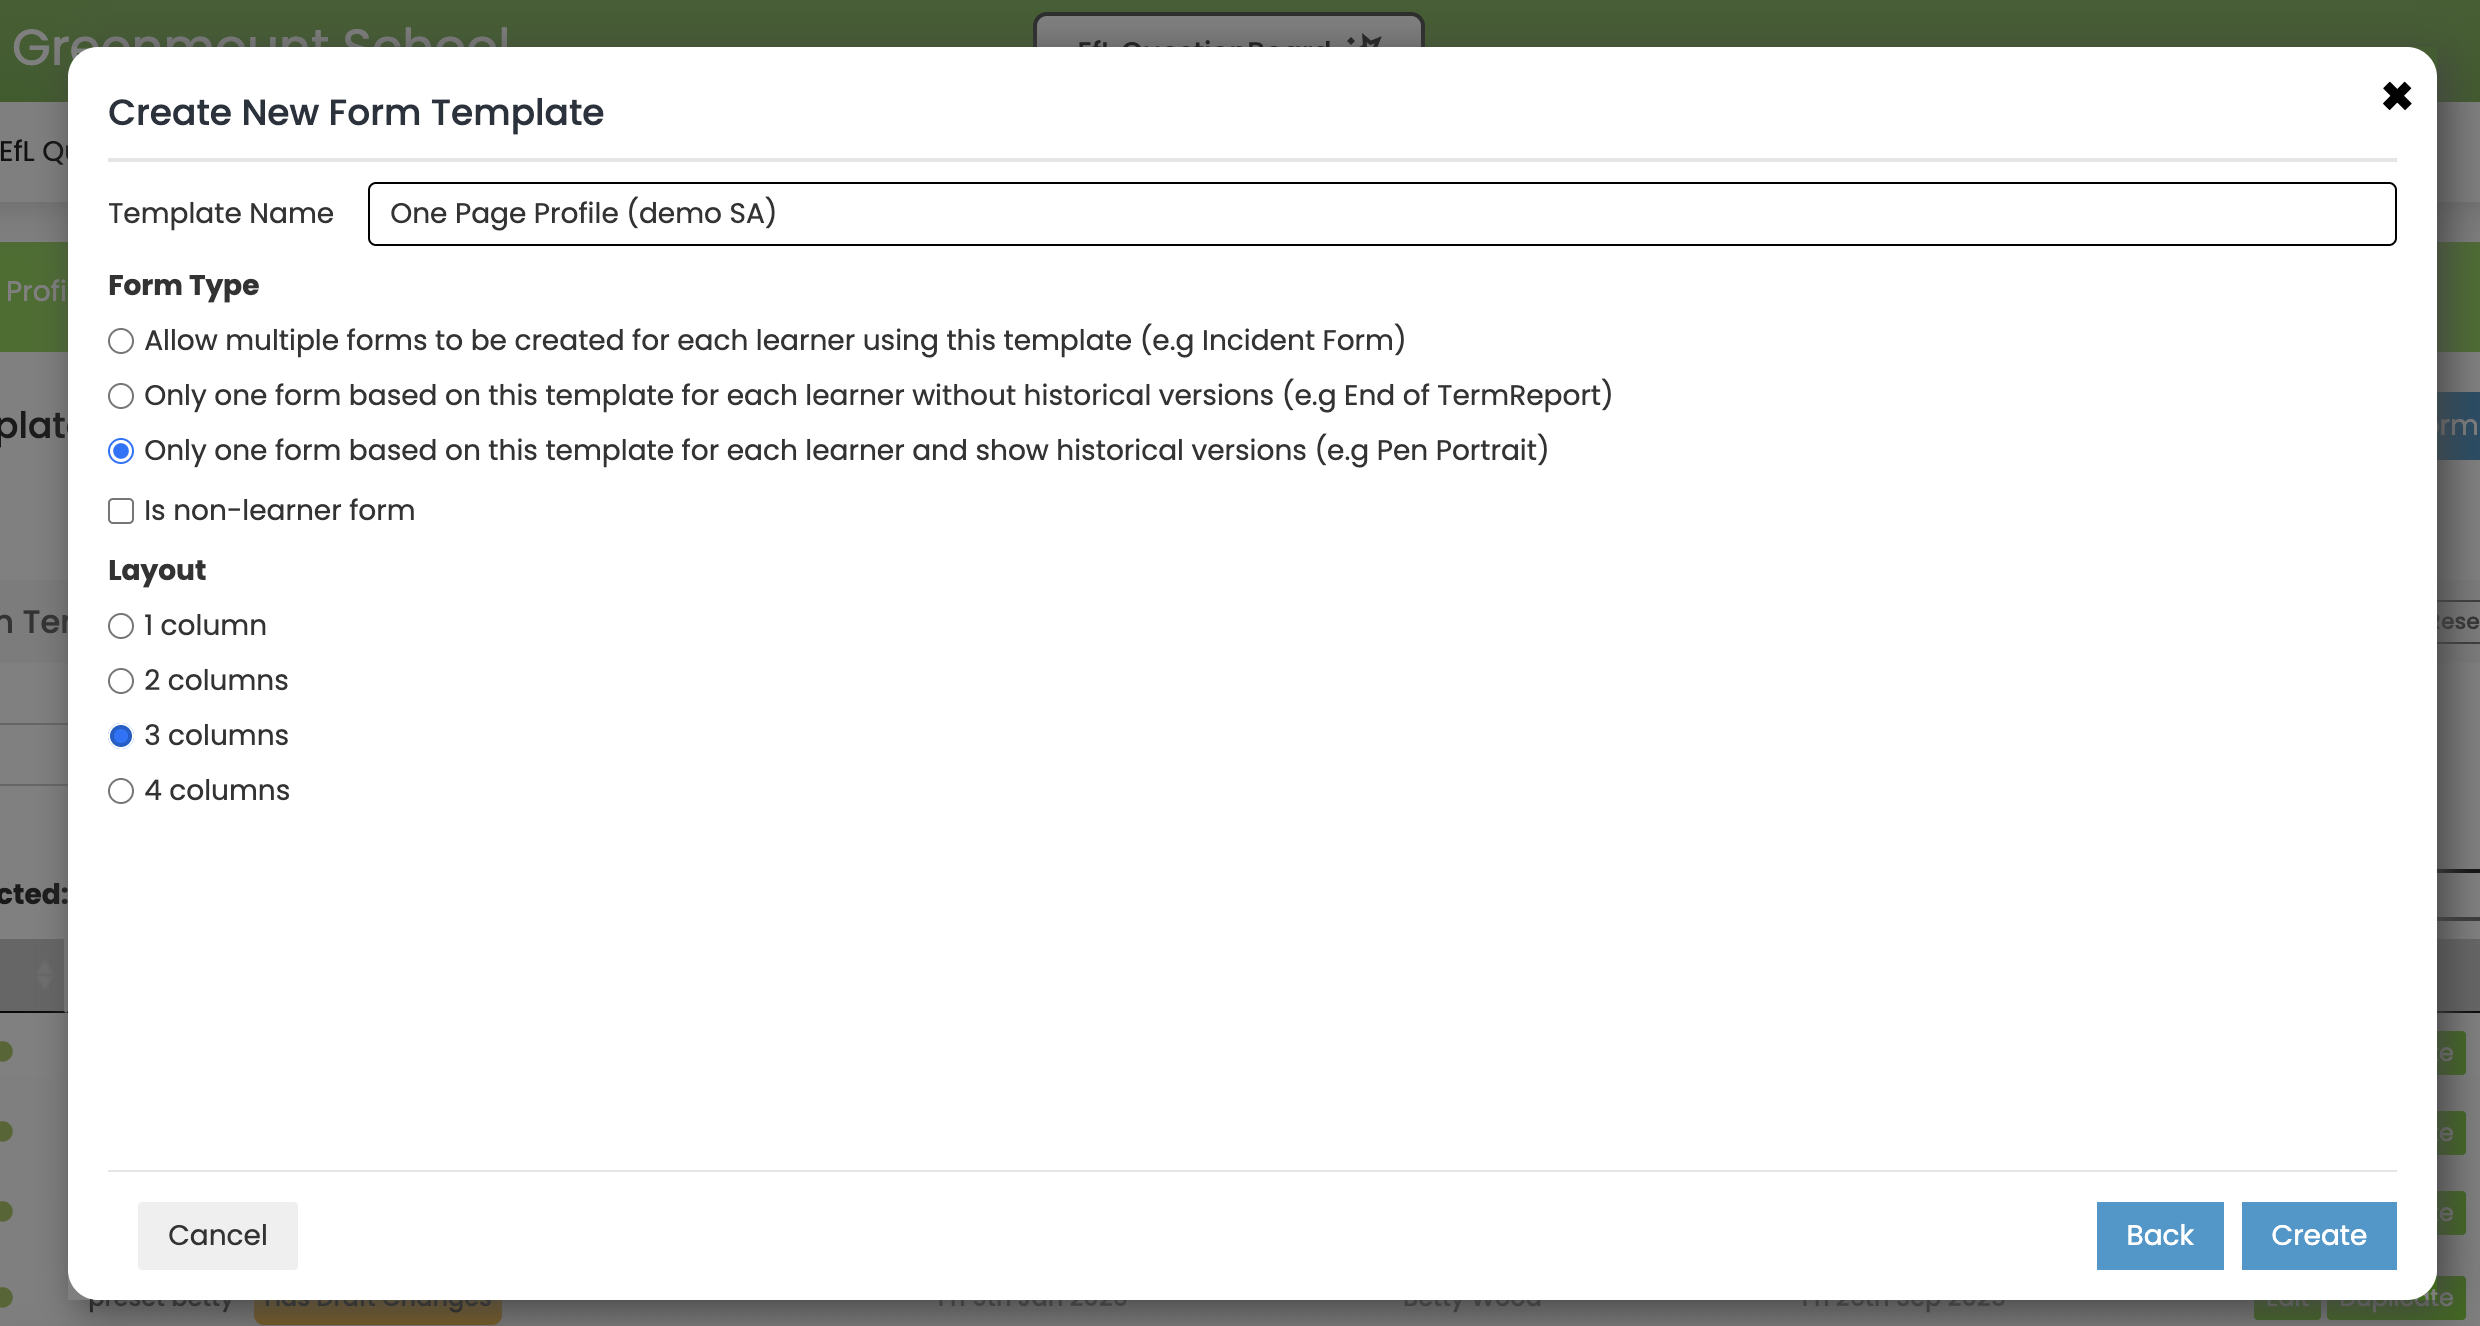
4. You will then be asked to give your New Form Template a name, what type of Form you would like to create, and the number of columns you will need for your layout.
See below...
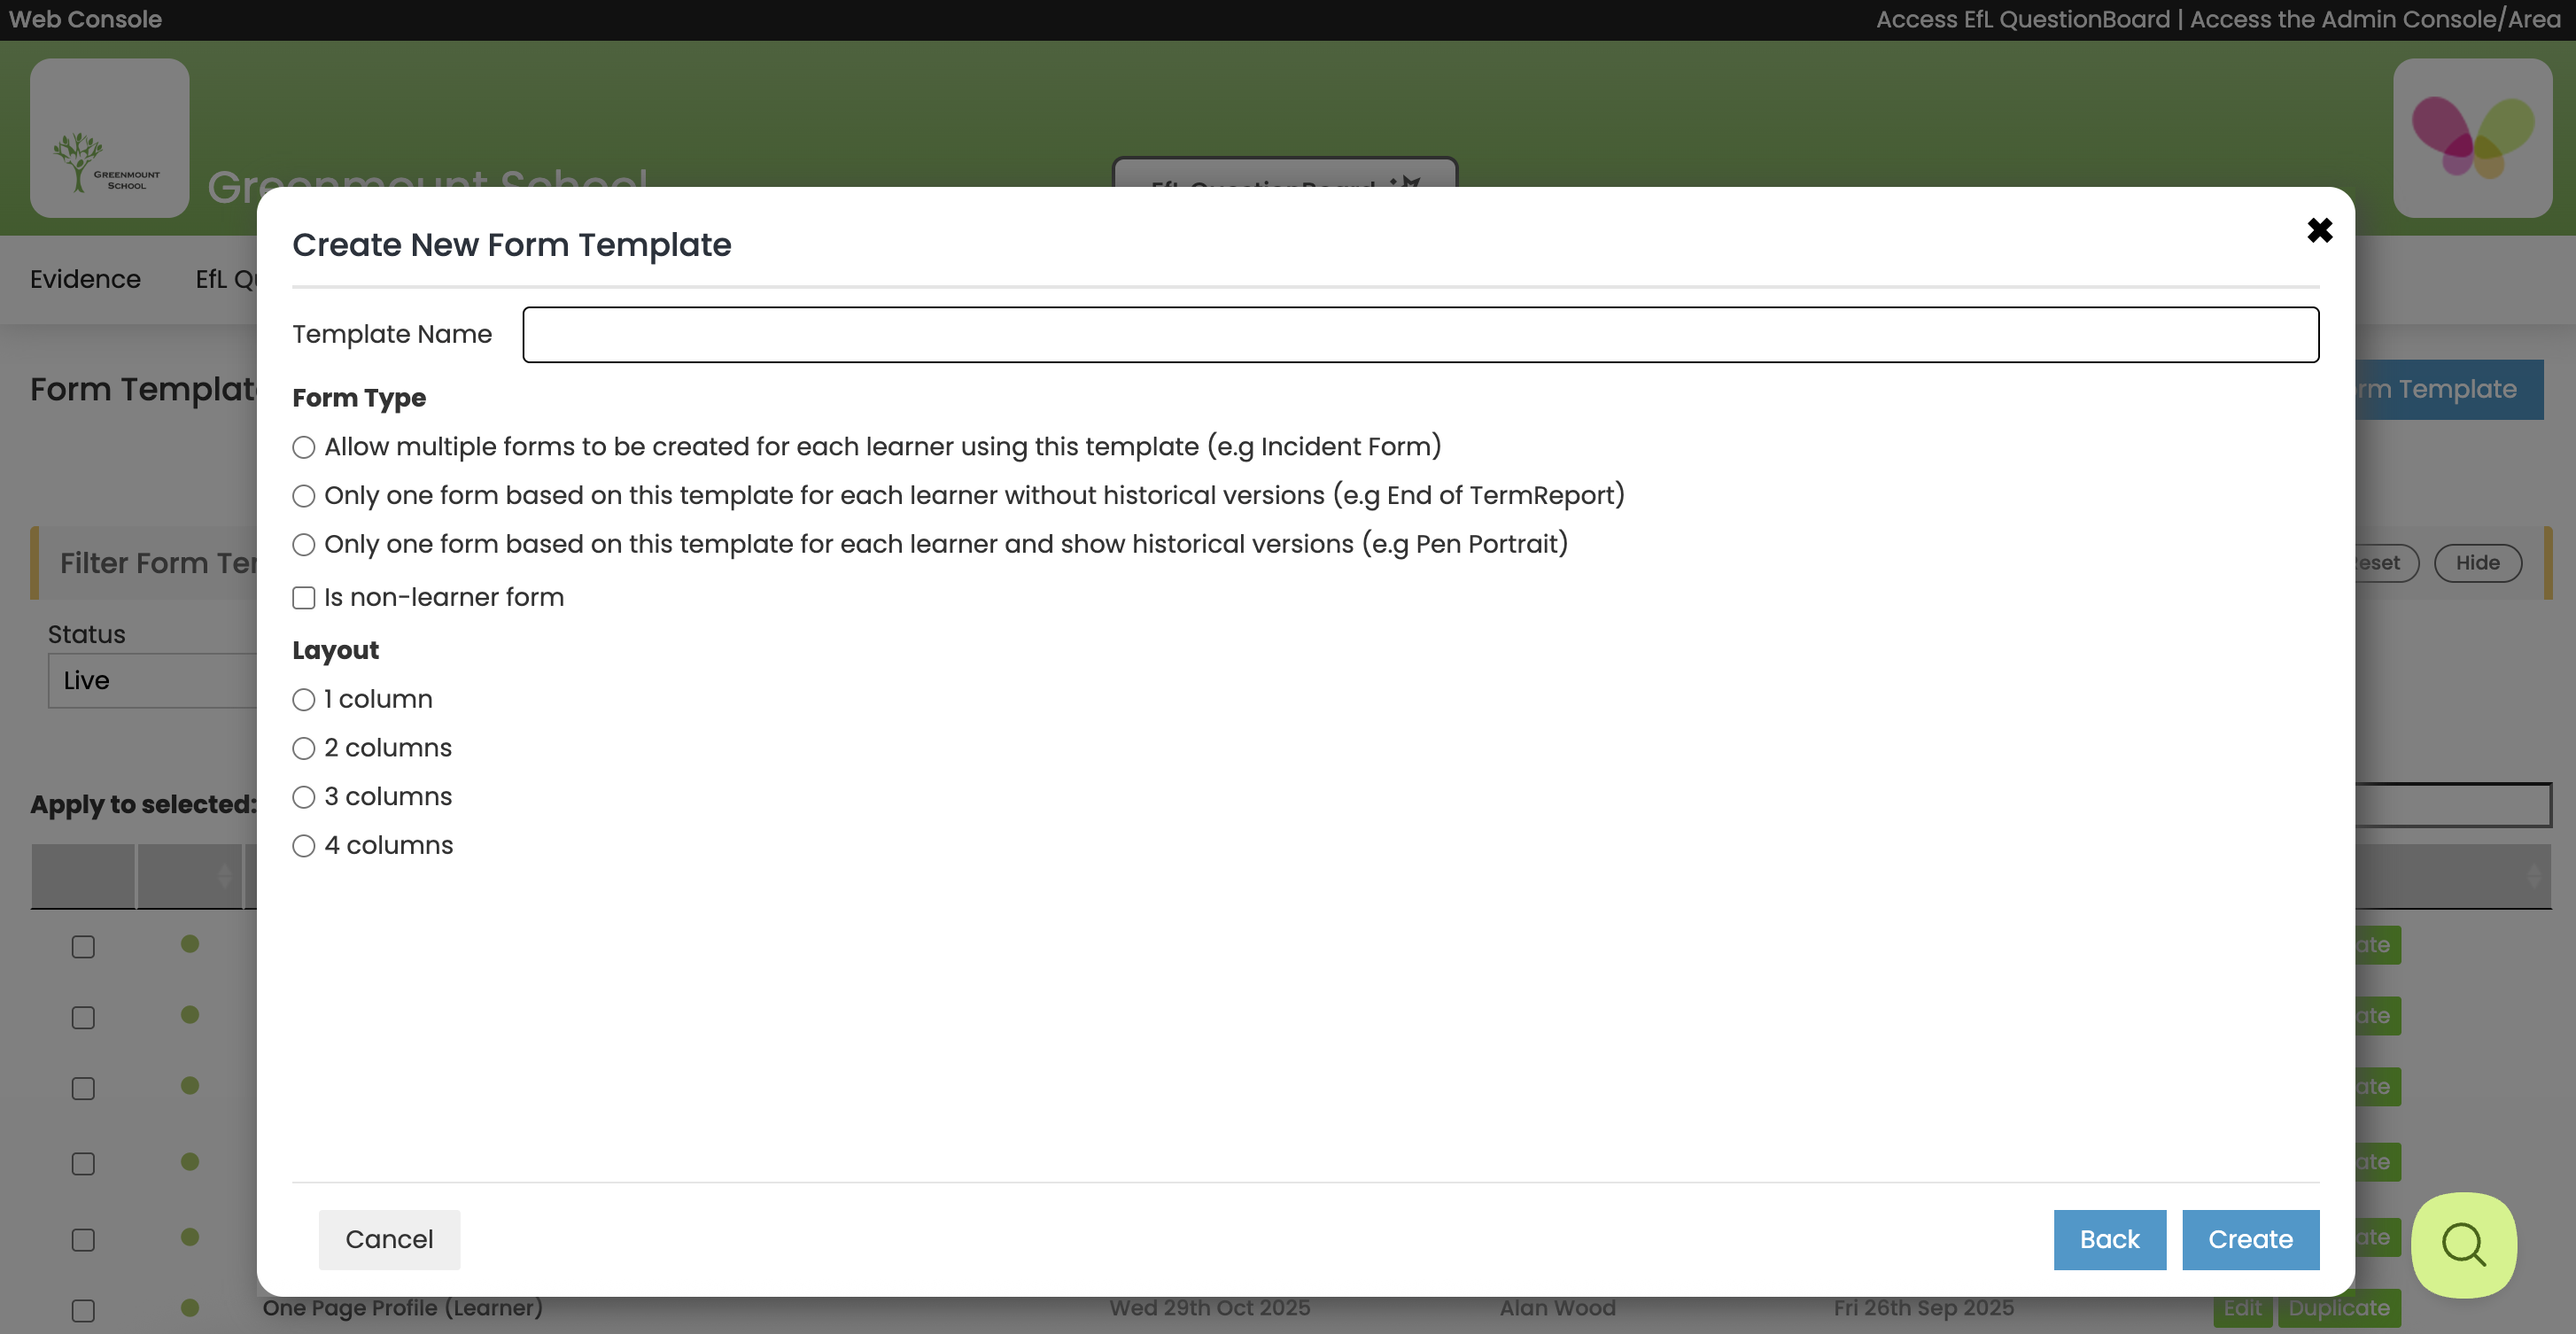
There are four different types of EfL Forms and these different configurations are set up here. They are:
- multiple Forms for individual Learners eg incident Form, homework Form
- a single Form for individual Learners without historical versions eg End of Term Report
- a single Form for individual Learners with historical versions ie changes can be tracked over time eg Pen Portrait, Pupil Profile
- a non-learner Form eg Curriculum on a Page
In this example we will create a single Form for individual Learners with historical versions ie a One Page Profile.
Once you have inputted your information select ‘Create’.
See below...

5. The Blank Canvas for your Template will then open in Form Template Editor.
See below...
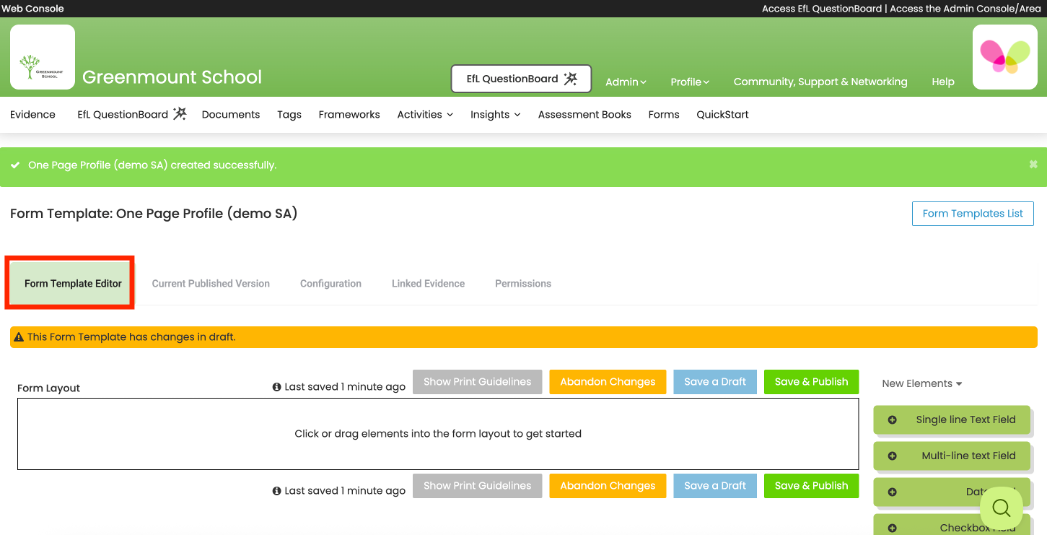
6. You can now begin to create your Form Template by dragging Elements into the Form Layout.
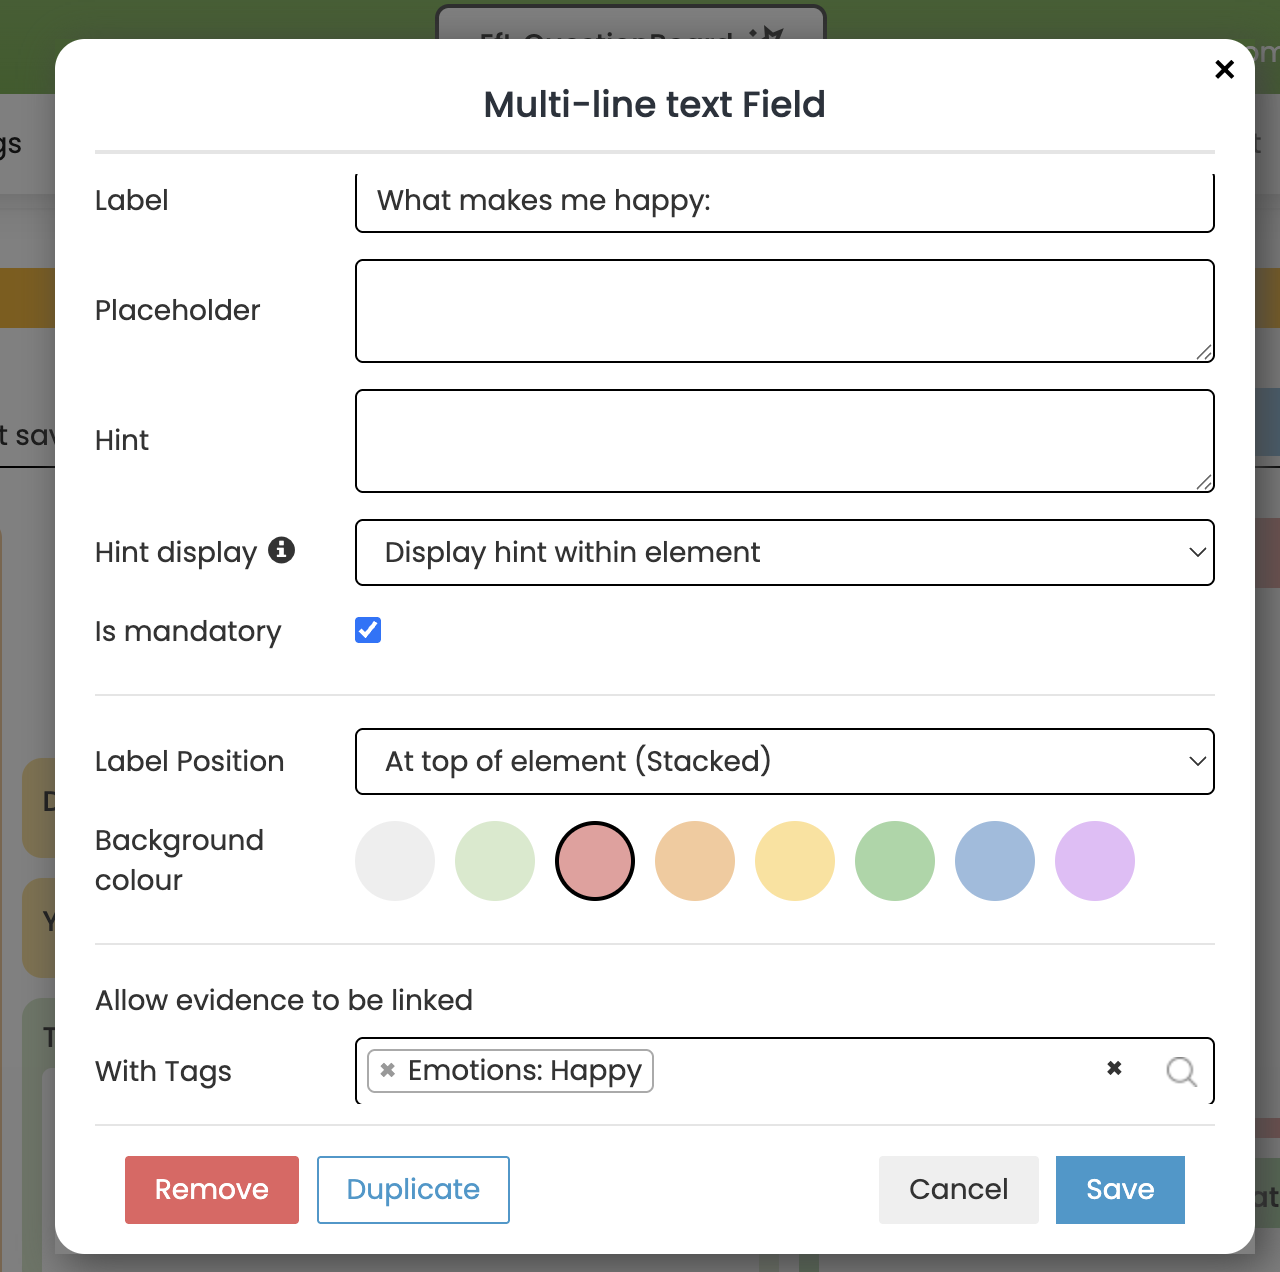
After dragging an Element into this space a pop-up window will appear showing the different options available for that particular Element. Enter your choices here as appropriate then click ‘Save’.
See below...
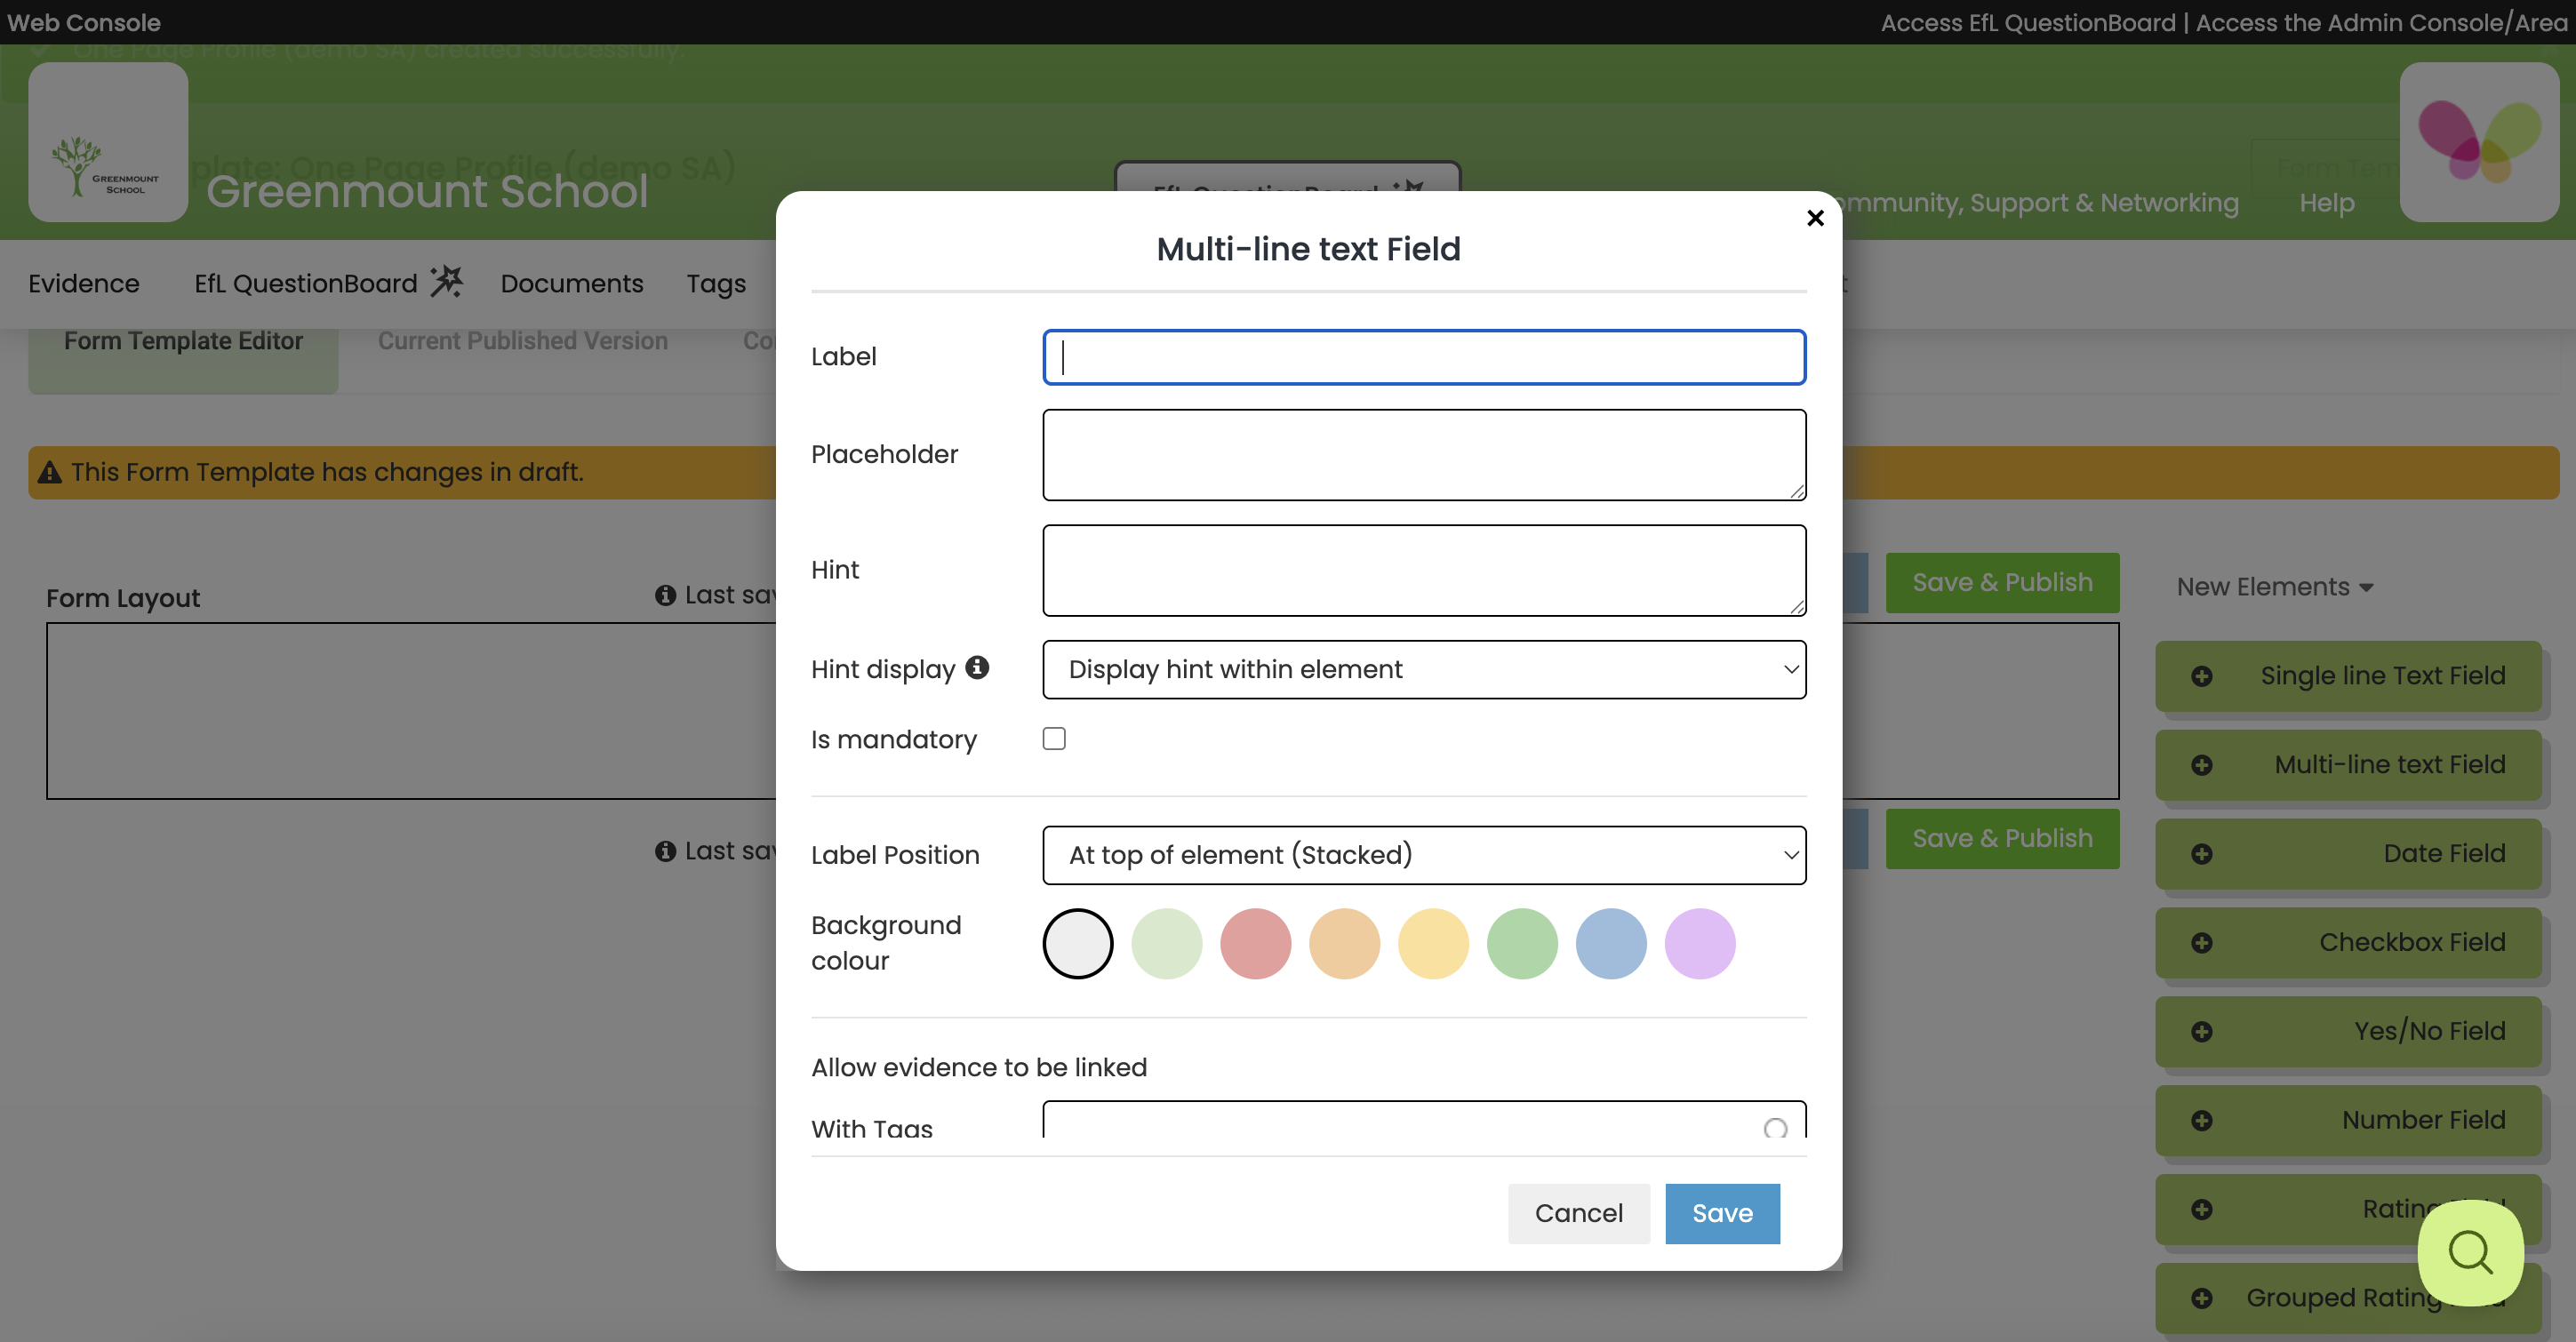
Label – This is the title given to the Element.
Placeholder – Any text inserted here will be visible to Form Users as a prompt on what to include. This will be overwritten once text has been added.
Hint – Hints are particularly useful as guidance on what particular Elements mean. For example, in this Engagement Model Template the meaning of the Engagement Model vocabulary has been included as a hint. Hints remain within the Form regardless of any text added, unlike Placeholder text which will be deleted.
Hint display – Hints can be displayed within the Element itself ie always visible on the Form, or as a rollover.
Is mandatory – Form Elements can be designated as mandatory for Form Users to complete.
Label position – The label can be positioned at the top of the Element or at the side. Side positioning is useful for Elements such as ‘Name – ‘.
Background colour – You can choose the colour of the Element from a number of options by clicking on the preferred colour.
Allow evidence to be linked with Tags – By adding a Tag here you can add specific Evidence to a specific Element. For example, a tag named ENGAGEMENT: Exploration could be created [see Step 2a of the Quickstart Guide on how to create Tags] and used to link Evidence specifically demonstrating Exploration.
Remove – Remove Element
Duplicate – Duplicate Element
Hover over an Element to see the grab button (bottom right) and use this to enlarge your Element.
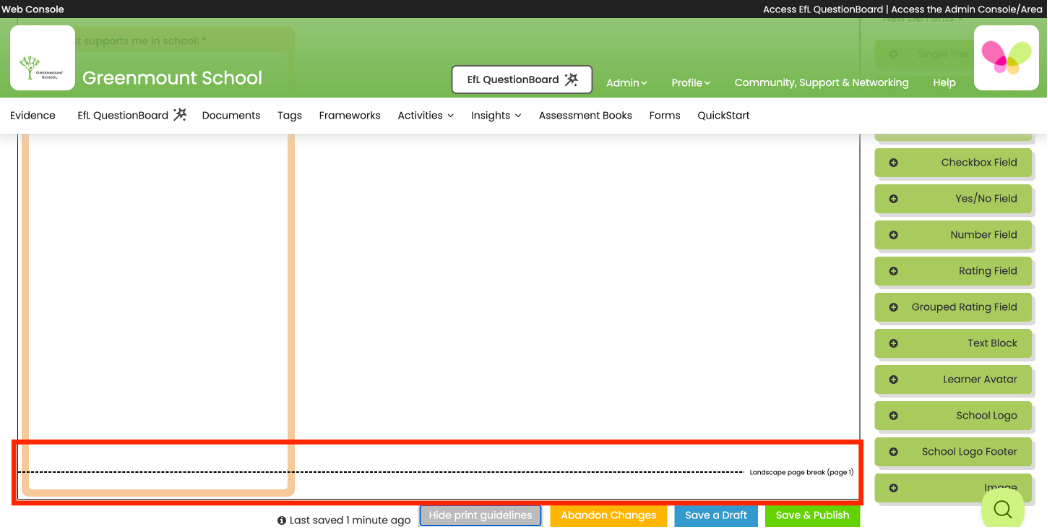
7. Click on ‘Show Print Guidelines’ above the Form Layout to view how the EfL Form will fit on a page once printed out as a PDF and help with your layout.
The guidelines will then appear.
See below...
8. Continue to drag and drop the various Elements that will make up your Form Template.
See below...
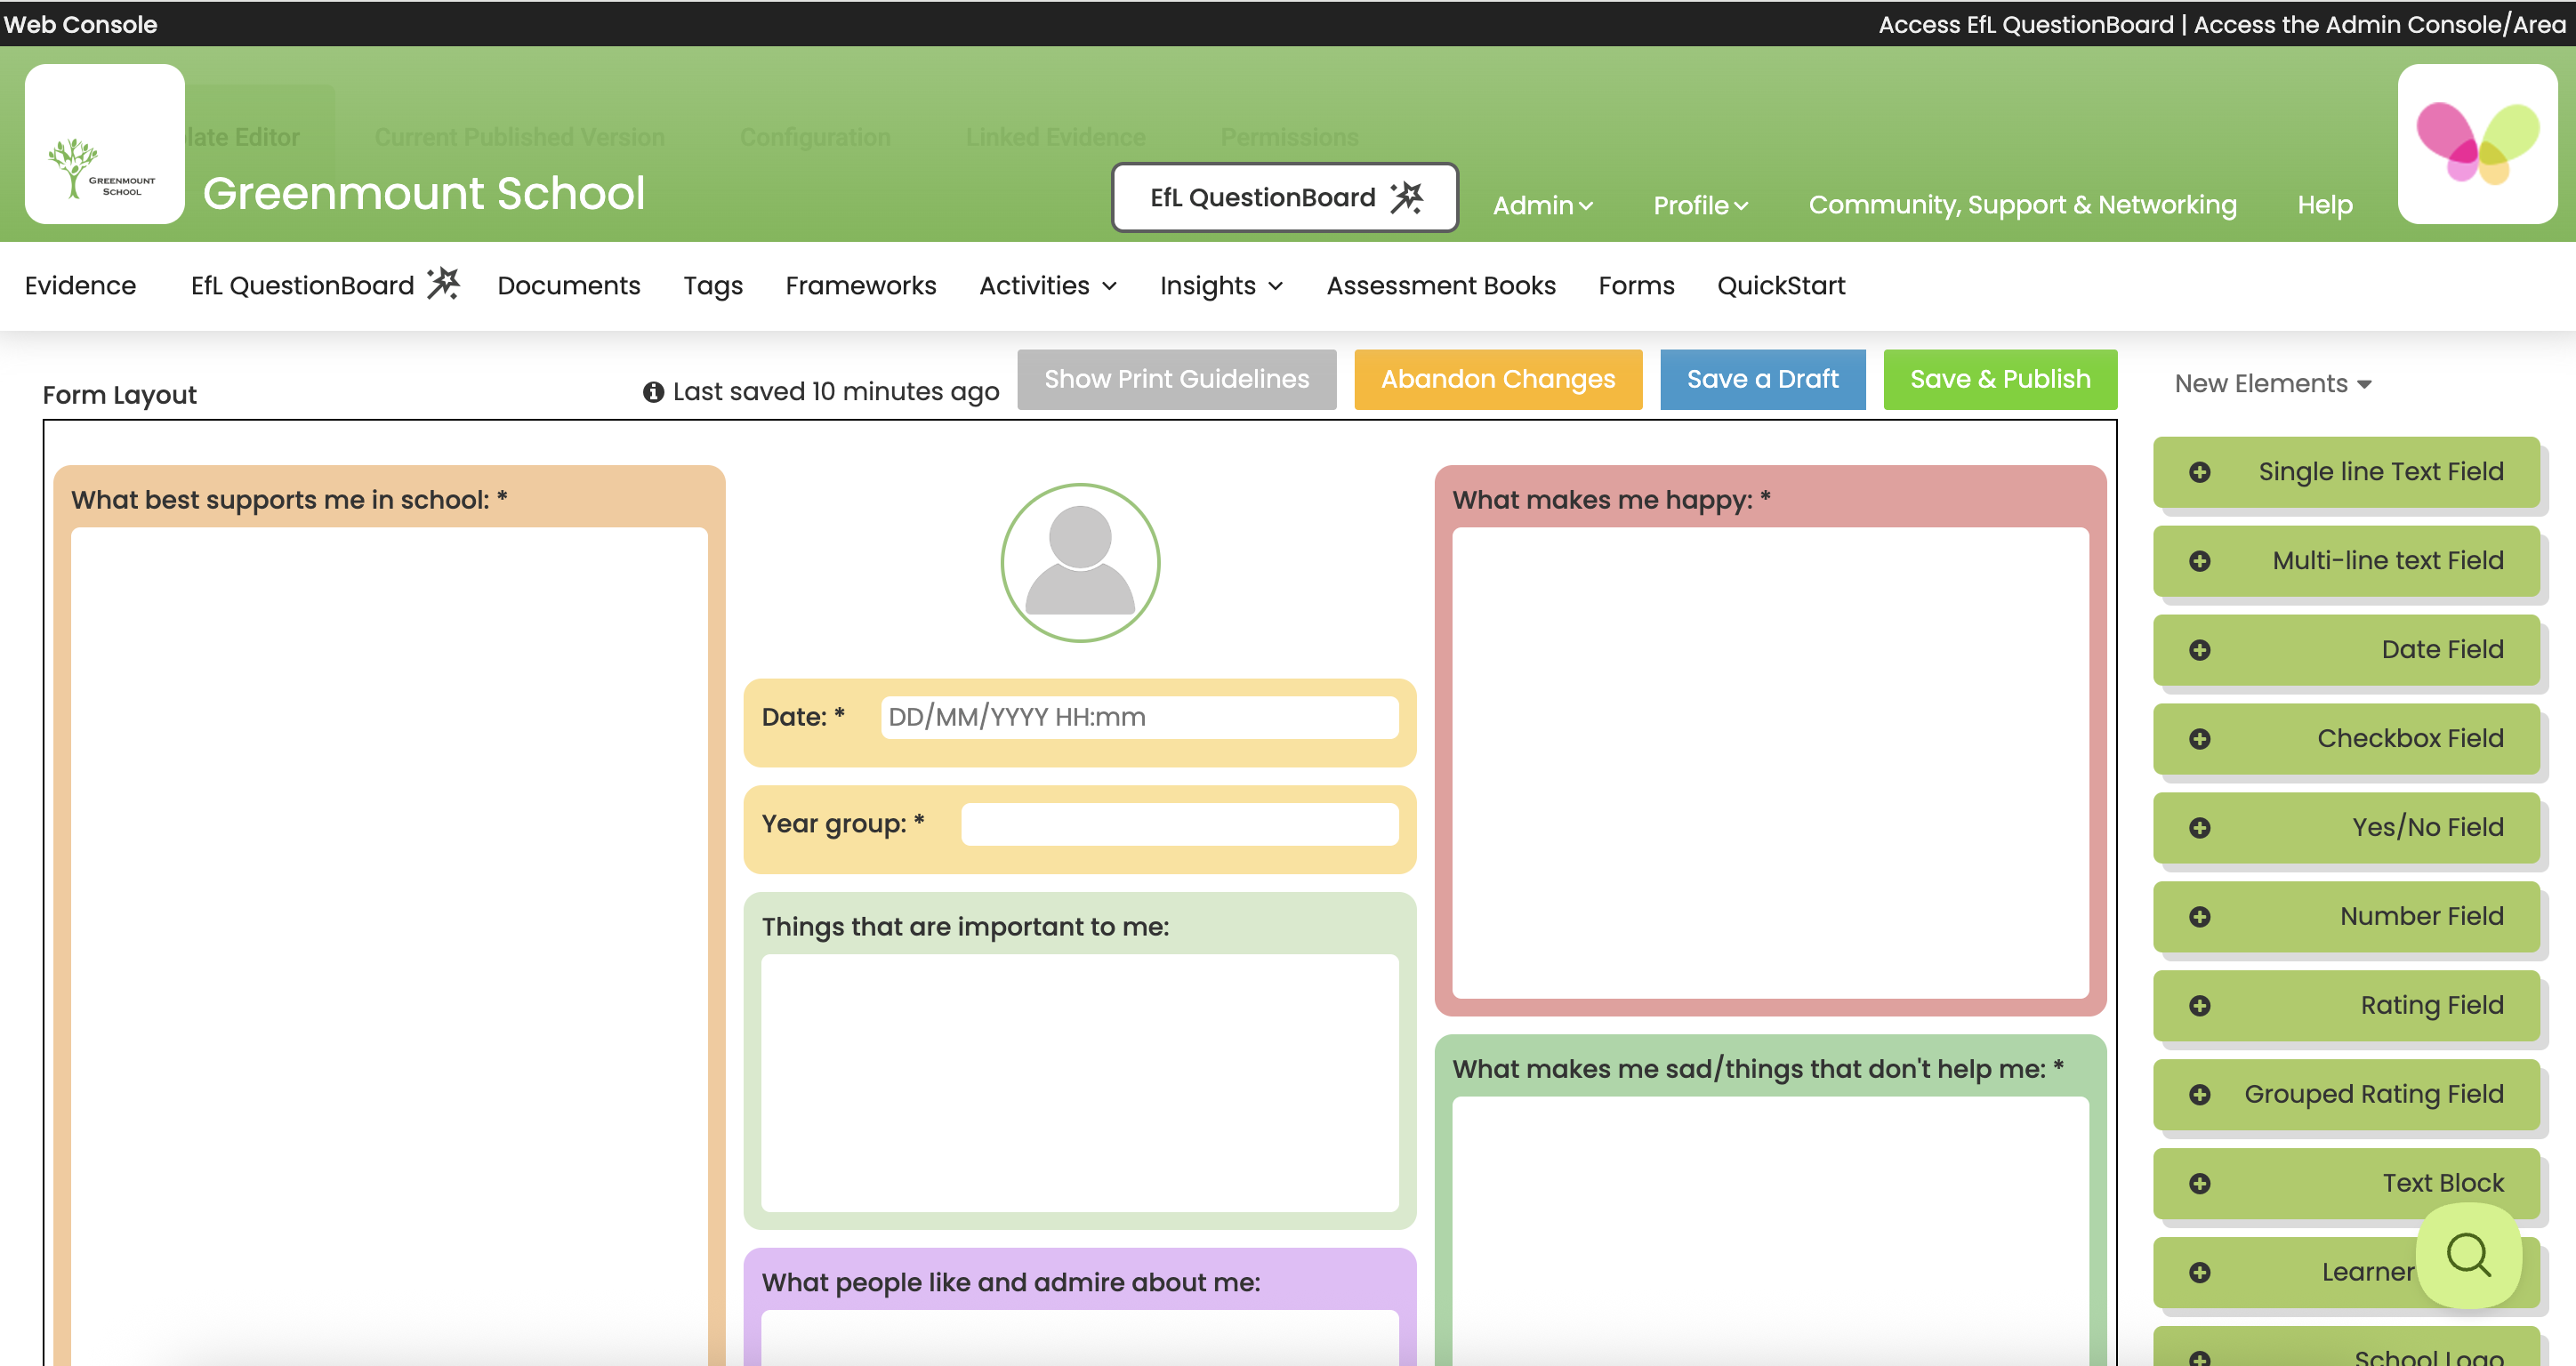
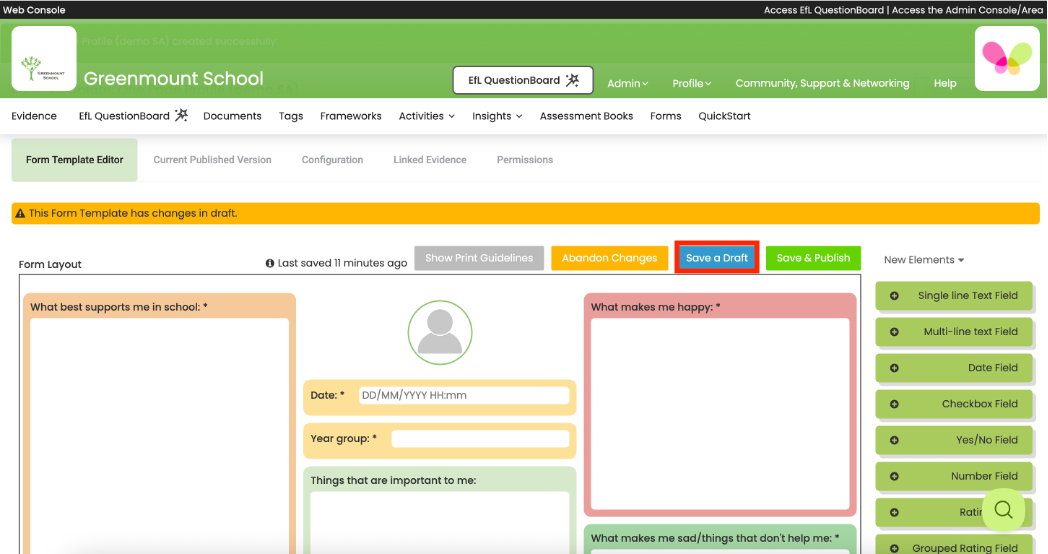
9. Click ‘Save a Draft’ if you want to continue working on your EfL Form Template later. EfL Forms only saves one draft at a time ie changes aren’t tracked over time.
See below...

10 Evidence can be automatically linked to a whole Form using Tags. EfL Forms will filter Evidence using this Tag/Tags first. It will then filter Evidence according to any Tags linked to specific Elements.
For example a Tag called ‘Form: One Page Profile’ has been created for this Form [see Step 2a of the Quickstart Guide on how to create Tags]. This tag is applied to the Form as a whole.
Another Tag named ‘Emotions: happy’ has been linked to the Element entitled ‘What makes me happy’ within this Form (see Step 6).
Adding both of these Tags to exemplary Evidence that demonstrates happiness will result in it being pulled through to the ‘What makes me happy’ Element rather than all Evidence tagged with ‘Emotions: happy’.
Click on ‘Linked Evidence’ to add Tags to this Form Template.
See below...
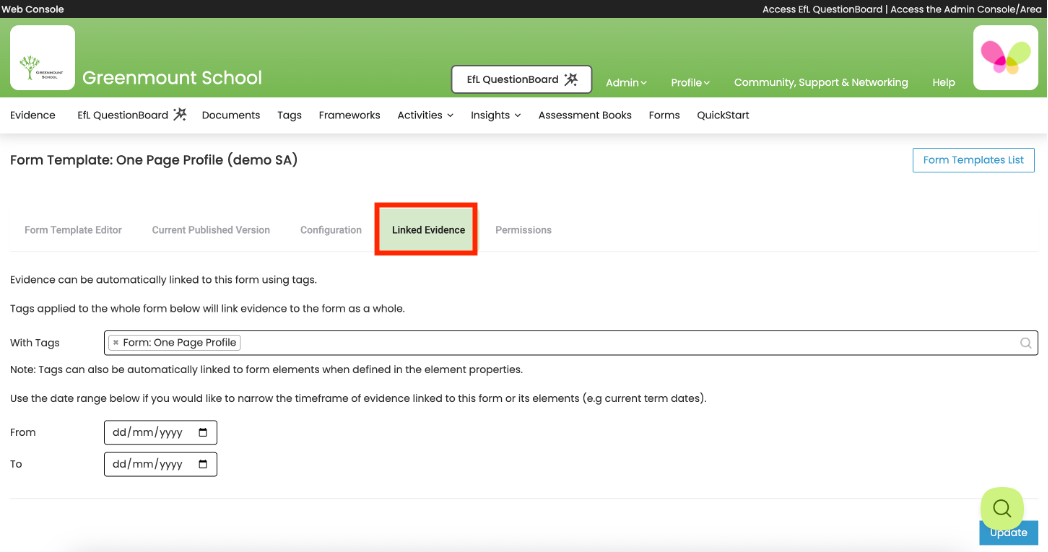
You can also narrow the timeframe of Evidence linked to the Form using the date boxes eg current term dates.
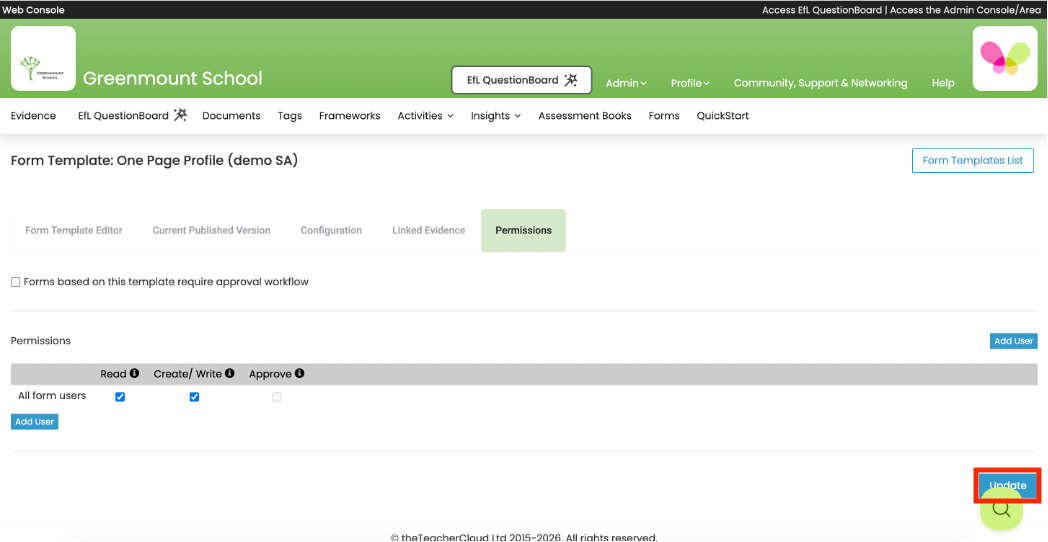
12. Next select ‘Permissions’ to give permission to your Form Users to use this template to create Forms.
See below...
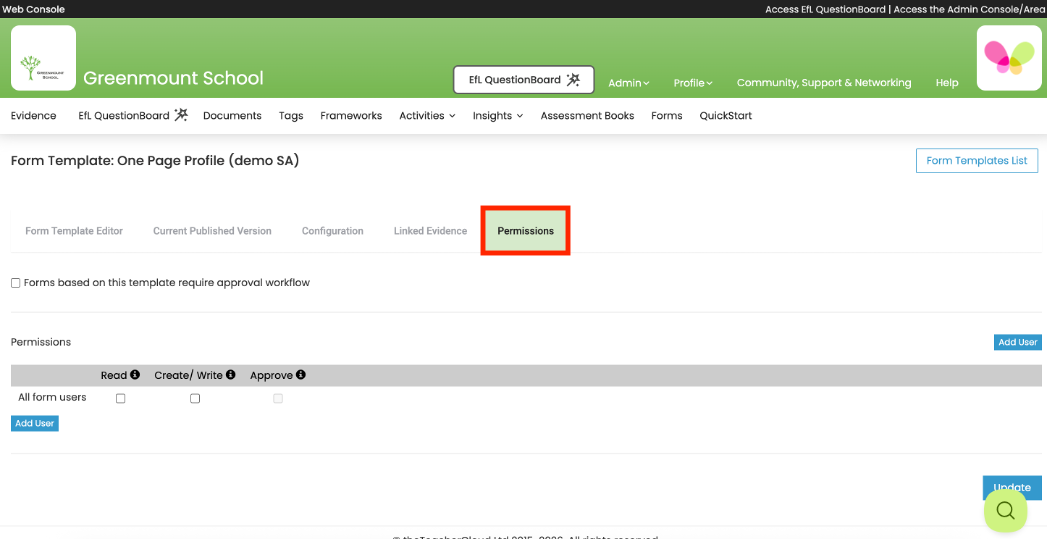
If Forms made using this Template require approval, select ‘Forms based on this template require approval workflow’.
To apply Permissions for All Form Users select appropriately.
Read – allows a user/s to read/view a Form and create PDFs based on the Form
Create – allows a user/s to create a Form based on this Template and add responses to Forms
Approve – this would give all Form Users permission to approve their own Form so isn’t generally used here but for individual permissions instead. Please note that Form Managers can automatically read, write and approve ALL Forms.
If you need different Form Users to have different Permissions leave ‘All form users’ blank and add each individual Form User and allocate permissions as appropriate.
Form Managers can read, write and approve ALL Forms so wouldn’t need adding individually.
Please note that after publishing your Template, if you then make changes to these Permissions they will only apply to Forms made from the time of republishing. For Forms previously created using that Template please change Permissions at individual Form level.
Once you have allocated your Permissions select ‘Update’
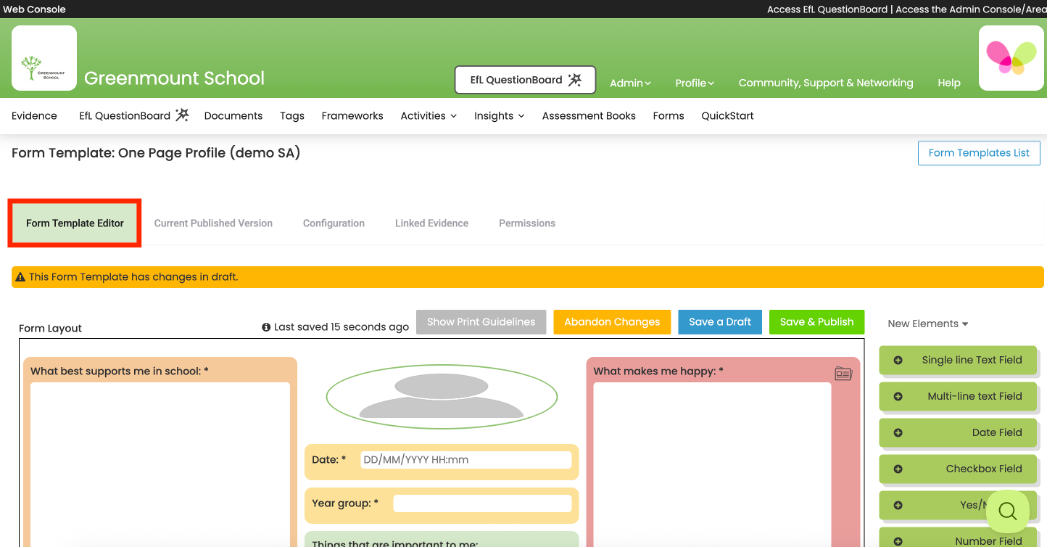
13. You can now select ‘Form Template Editor’ to return to the main editing page.
See below...
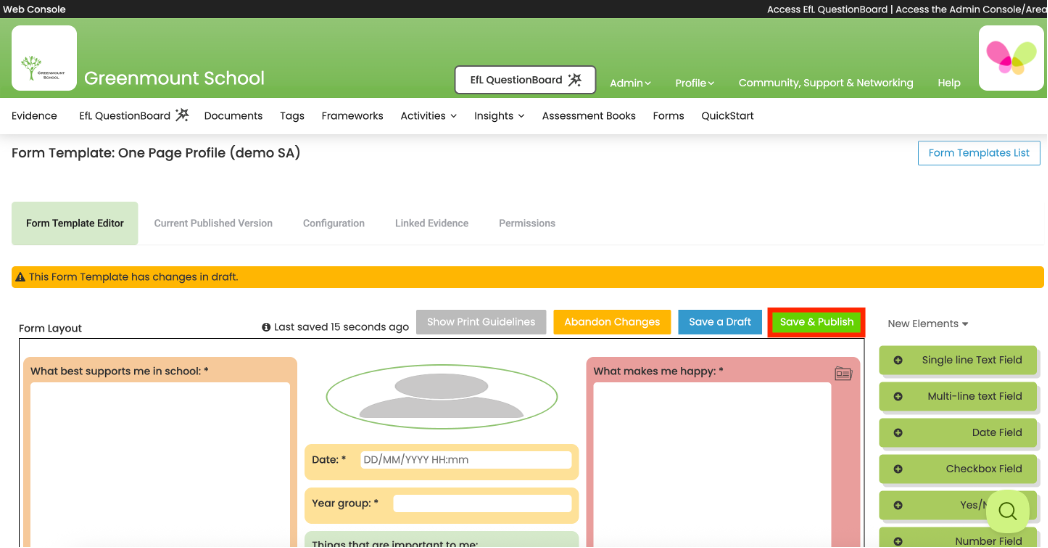
Check that your Form Template is how you want it to look then click ‘Save & Publish’.
See below...

14. Your Form Template will then appear on the Form Templates list and will be available for Form Users to select in order to create a Form of this type.
Now you have set up a Form Template you can start creating Forms for individual pupils. Please see our video/guide entitled ‘Create and Edit a Form’.